Import SharePoint data to Fabric
Before you continue reading the article, I would like to point out that it already assumes certain knowledge of APIs, Python, SharePoint, Microsoft Fabric
Let’s have a SharePoint list as a data source and a Fabric Lakehouse as a storage for analytics data. But how do we get the data from point A to point B? Microsoft Fabric offers the following options:
- Copy activity in pipelines
- Dataflows Gen v2
- Apache Spark Notebook / Job definition
In this article, I will explain the last option, which is to import using Apache Spark Notebook, specifically using Python. I won’t go into comparing the other options. However, I can recommend you this article from friend of mine 🙂
The data in SharePoint is available through an API, which is of course secure. To make it not too easy there are even two APIs in use - Microsoft Graph API and SharePoint REST API.
| SharePoint REST API | Microsoft Graph API |
|---|---|
| older, used by the SharePoint Online | more modern, unified interface, wrapper for SharePoint REST API |
| exposes many endpoints | exposes only a small part of the endpoints, still being developed |
| supports expanding complex columns (e.g. Person, Lookup) | does not support expanding complex columns |
| uses internal column names | uses display column names |
| complicated authentication settings | easier to set up authentication |
Before we start implementing data import, we need to decide which API to use. I decided to use the SharePoint REST API.
The first reason is that it works with internal column names, which ensures that the import mechanism doesn’t break the moment someone changes the display name of a column.
The second reason is the support for column expansion, this benefit is important because of Person columns. SharePoint stores the user ID in the Person column, but it is not an global ID from Azure Active Directory, it is an integer ID specific to SharePoint only. In order to relate user data from SharePoint with other systems, we need a better identifier, e.g. email, which we can get just by expanding the field. In the case of the Graph API it would be more complicated, to get the user’s email from their ID we would have to look at a special hidden list in SharePoint called the User Information List. Which makes the whole process more complicated and also slows it down! 😕

So it’s decided to import using Python and use SharePoint REST API for that. What next? 🤔
Now we need to setup authentication. Since the data import takes place without the user’s interaction, we want to use the Client Credentials Flow. If we use the Microsoft Graph API, we would only need to create a new application object in Azure AD and set the required scopes. For the SharePoint REST API, the process is different.
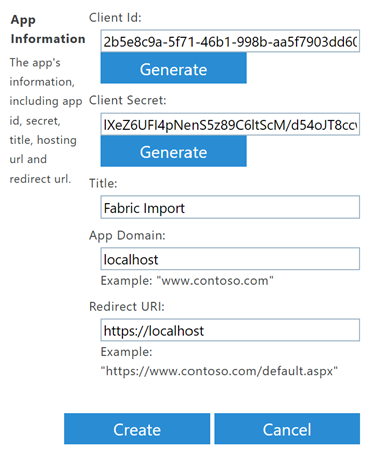
The application object is created directly in SharePoint using the following link:
https://{org-domain}-admin.sharepoint.com/_layouts/15/appregnew.aspx
A form is displayed, which you fill out as follows. The client id and the client secret are set after selecting the generate buttons and the title field is completely up to you.
❗It is important to securely save the client id and secret❗
In case you are unable to create the application object, make sure that you are logged in as SharePoint Admin and also that it is allowed to create application objects in your tenant. Alternatively, the tenant settings can be changed using following PowerShell script.
Install-Module PnP.PowerShell
Connect-PnPOnline -Url "{org-domain}-admin.sharepoint.com" -Interactive
Set-PnPTenant -DisableCustomAppAuthentication $false
Once the application object registration is complete, you must grant it permissions at the link:
https://{org-domain}-admin.sharepoint.com/_layouts/15/appinv.aspx
In the form, just fill in the app id (client id from previous step) and after pressing the lookup button, the details of the object will be filled in. In the last field, just add the following definition that will grant full control to the client app. Setting up restricted access is documented on this link.
<AppPermissionRequests AllowAppOnlyPolicy="true">
    <AppPermissionRequest Scope="http://sharepoint/content/tenant" Right="FullControl" />
</AppPermissionRequests>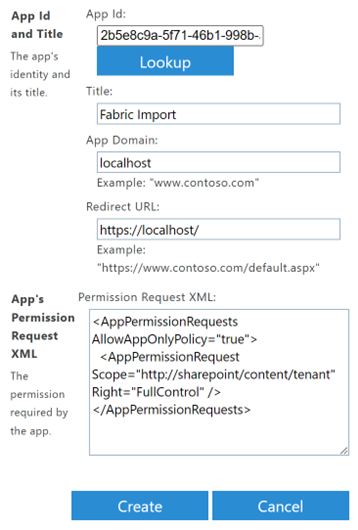
After pressing the create button, you must confirm the permissions in the dialog using the trust it button.
Now we have created the application object and we can move to Fabric, where we need a workspace in which the Lakehouse and Notebook are created and linked.
In order to query the SharePoint API we will need an access token. We can get it using this custom get_access_token function, which sends POST request to OAuth endpoint with client credentials in the body and returns access token.
import requests

def get_access_token(tenant_id, client_id, client_secret, org_domain):
    url = f"https://accounts.accesscontrol.windows.net/{tenant_id}/tokens/OAuth/2"
    headers = {'Content-Type': 'application/x-www-form-urlencoded'}
    body = {
        "grant_type": "client_credentials",
        "client_id": f"{client_id}@{tenant_id}",
        "client_secret": client_secret,
        "resource": f"00000003-0000-0ff1-ce00-000000000000/{org_domain}.sharepoint.com@{tenant_id}"
    }

    response = requests.request("POST", url, headers=headers, data=body)
    response.raise_for_status()
    return response.json()

jwt_token = get_access_token(
    "tenant-id",
    "client-id",
    "client-secret",
    "org-domain"
)["access_token"]
sharepoint_access_token = f"Bearer {jwt_token}"
Test the access token retrieval. If you receive the error message “Token type is not allowed”, you must enable Custom app authentication using PowerShell as described when creating the application object.
By the way, I strongly recommend saving the client id and secret in Azure Key Vault and retrieving them in the notebook directly from Key Vault as follows.
client_id = mssparkutils.credentials.getSecret("keyvault-url", "secret-name")
client_secret = mssparkutils.credentials.getSecret("keyvault-url", " secret-name")
Now we can finally retrieve data from a SharePoint list using the SharePoint REST API. To do this, we will need information about the list being loaded, specifically list ID and the site name. Both values can be read from the URL of the SharePoint list’s settings page, which is as follows:
https://{org-domain}.sharepoint.com/sites/{site-name}/_layouts/15/listedit.aspx?List=%7B{list-id}%7D
Once we have these values, we can implement get_all_list_items function.
def get_all_list_items(org_domain, site_name, list_id, select="", expand=""):
    # compose url
    base_url = f"https://{org_domain}.sharepoint.com/sites/{site_name}/_api"
    relative_url = f"/web/lists(guid'{list_id}')/items?$select={select}&$expand={expand}&$top=5000"
    url = base_url + relative_url

    headers = {
        "Authorization": sharepoint_access_token,
        "Accept": "application/json; odata=nometadata"
    }

    data_pages = []
    fetch_next = True

    # iterate pages
    while fetch_next:
        response = requests.request("GET", url, headers=headers)
        response.raise_for_status()
        response_data = response.json()

        data_pages.append(response_data["value"])
        url = response_data.get("odata.nextLink")
        fetch_next = url != None

    # flatten
    return [item for page in data_pages for item in page]

items = get_all_list_items(
    "{org-name}",
    "{site-name}",
    "{list-id}",
    "ID, Title, Author/EMail",
    "Author"
)
First of all, I would like to mention pagination. The endpoint for reading list items returns a maximum of 5000 items. If there are more records in the list, the returned response contains odata.nextLink with a link to another page. Thus, the get_all_list_items function keeps calling the endpoint while more pages are available and then combines the results into a single list which it returns.
There is also a select and expand parameter. In select we specify which columns should be returned. Since we are querying for a nested value in a complex column (Author/Email ), it is necessary to expand the complex column. Lookup columns work the same way.
Result looks like this:
[
    { "Author": { "EMail": "AdeleN@k7pk.onmicrosoft.com" }, "Title": "Train ML model", "ID": 1 },
    { "Author": { "EMail": "AdeleN@k7pk.onmicrosoft.com" }, "Title": "Create IM web app", "ID": 2 },
    { "Author": { "EMail": "admin@k7pk.onmicrosoft.com" }, "Title": "Create my first PWA", "ID": 3 }
]
In order to save the data to Lakehouse, we need to create a dataframe with a schema. The schema is important so we can later flatten the data structure (get rid of the nested Author/EMail ).
items_schema = StructType([
    StructField("ID", IntegerType(), True),
    StructField("Title", StringType(), True),
    StructField("Author", StructType([
        StructField("EMail", StringType(), True)
    ]), True)
])

items_df = spark.createDataFrame(items, schema=items_schema)
Finally, now we just have to flatten the structure using the select method and then save the data into a table in Lakehouse.
items_df = items_df.select("ID", "Title", col("Author.EMail").alias("Email"))
items_df.write.mode("overwrite").format("delta").option("overwriteSchema", "true").save("Tables/Ideas")
And here goes the result! 🥳

To sum it up 😵💫 We were able to retrieve data from a SharePoint list without user interaction with respect to pagination, plus we were able to expand complex columns, flatten the data structure and save it as a table in Fabric Lakehouse. Now you just need to set up a schedule ⌚ or plug the notebook into the pipeline and you can start building your ELT/ETL process!
Finally, I would like to add that in the case of implementation for many data sources, a lot of redundant source code can be generated. I address this issue in my repository fabric-sharepoint-import.